DSLR Microscope Adapter - Shooting Tips
| 1. Focusing |
| The camera lens needs to be removed from the camera body to attach the
microscope adapter; thus, the focuscannot be adjusted by the camera side. Therefore, please use microscope focusing knobs for focusing. Also, the focal point of the LCD monitor and microscope eyepiece is typically non-parfocal. Please adjust focusing with the LCD image, not with an image you see in an eyepiece. DSLR models with live-view features enable you to adjust focus easily on large TV/PC screens. |
| 2. Stabilizer |
| Even the slightest movement would cause the image to blur when taking microscope photos. Using a remote switch or a self-timer is recommended to avoid this problem. Also, utilize vibration mode (for about 1 second) if the camera has the feature. |
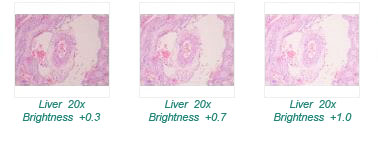
| 3. Exposure Adjustment |
| It is easier to shoot with Aperture Priority Mode (dial A). When an image is too dark or bright, adjust your Aperture Settings (±). Higher apertures correspond to darker images, and lower apertures correspond to brighter images. |
|
|
| 4. White Balance |
| When the captured image appears too bluish or reddish, set the white balance manually. 1. Adjust the lighting to the desired level and fix it. 2. Remove samples from the microscope stage. 3. Expose the camera sensor to a blank and white target to have the camera recognizes it as white. * Use a glass (with no sample) as a target for a biological microscope. * Use a white/gray plate as a stereo/metallurgical microscope target. Once manually adjusted, you can capture the sample with an accurate color tone. Many DSLR models have a Color Space feature to reproduce desirable color tones afterward. |
| 5. ISO Sensitivity |
|
When you shoot at high ISO speeds, noise (such as dots of lights and banding)
may become noticeable. When a captured image is too dark, use a slower shutter speed or change the microscope light volume. It will enable to capture images with a low ISO speed. |
| 6. Other |
| For bio-microscopes, set the condenser to the appropriate position so the aperture follows the designated magnification. (* refer to your microscope manual for detailed instructions) |
 |
 |